Intro to Testing Video
If debugging is the process of removing software bugs, then programming must be the process of putting them in.
- Edsger Dijkstra
Testing
| Learning Objectives |
|---|
| Describe the motivation behind software testing |
| Describe what testing is |
| Describe how testing benefits us as engineers |
| Describe base cases and edge cases |
| Describe and write a unit test |
1. Why do we test our code?
Any sufficiently complex program is virtually guaranteed to have bugs. As software developers, a large portion of our time will be devoted to identifying, fixing, and preventing these bugs.
We’ve already had some practice with manually searching code for bugs. But what if we could write programs that automated this verification for us? By investing a small amount of time now to write these test programs, we could save time later by not repeating these verifications manually.
2. What is software testing?
Software testing is the practice of verifying that the code we write does what we expect.
There are many different types of tests, which can be categorized depending on their purpose.
Here are a few of the many different ways we classify tests:
Automatic vs. Manual:
- Manual: A test that is performed by a human
- Automatic: A test that is performed by a computer program
Unit vs. Integration vs. System
- Unit: A test that verifies a small isolated piece of code
- Integration: A test that verifies that isolated pieces of code work in combination
- System: A test that verifies all of the code in our application at once
Software testing is a broad field of related technologies and techniques. In this course we will only be focusing on one specific type of testing: Automated Unit Testing.
What is a Unit Test??
An Automated Unit Test is a small program that verifies if a small, isolated piece of code does what we expect it to do.
Typically, a developer will write their own unit tests for any code they develop. Also, unit tests are usually written in the same programming language as the code they test.
How do we implement a Unit Test?
In practice, a unit test is made up of an assertion (a statement of truth), and a call to the code we are testing that allows us to check if the assertion is true.
Let’s start by looking at this function:
// given a number, determine if that number is even
function isEven(num) {
  return num % 2 == 0;
}
Intuitively, we understand that this function should evaluate whether or not a number is even, but how do we verify that the code does that?
Let’s start by writing down our assertions:
- If we call this function with an even number, we expect the function will return true
- If we call this function with an odd number, we expect the function will return false
Let’s see what these expectations look like expressed as code using the testing framework Jest:
test("It should return true when called with an even number", () => {
  expect(isEven(2)).toBe(true);
});
Notice how similar the code is to the English language assertions we wrote earlier. Most JavaScript testing frameworks attempt to be as similar to natural language as possible.
In this test, we make calls to three functions that are part of the Jest library. Let’s investigate them now:
-
test()
- This function takes two required arguments:
- The name of the test (this is how we will see the output of the test in our console)
- An anonymous arrow function where we perform the test
-
expect()
- The expect function takes one argument:
-
The value that your code produces.
- For our Unit Tests, this will always be a call to the function we are testing with specific arguments
-
toBe()
- The toBe() function takes one argument:
- The value that we expect should be returned by the code inside our expect() function
Methods like 'toBe', 'not', and others like 'toBeTruthy' are what we call matchers in the jest library. There are many built in jest matchers and alternative third party libraries that provide additional matchers if you choose to use them. You should familiarize yourself with some of the options you have for writing assertions in jest by reviewing the jest documentation on using jest matchers.
(optional) Jest and ESM and cjs modules
This is a brief aside for future note. Jest doesn't support something called ESM out of the box. ESM means ECMA-script modules. This is a special module syntax used in many javascript frameworks. We typically use a syntax called common javascript modules or CJS. You may run into situations where jest fails to import code you wish to test because that code was built inside of a module format that jest isn't aware of. There are multiple ways to correct for this. The most common correction would involve utilizing an interpreter like babel and included some of the jest bable libraries such as @babel/plugin-transform-modules-commonjs and babel-jest. You may run into this if you are writing tests for frameworks that use ESM such as react or if a project your working in chooses to use ESM and jest tests.
Read up on the jest's teams current state of supporitng ESM modules here.
Read up more on ESM vs cjs modules as well as some other alternative modules paradigms here
Running tests and evaluating the results
Once Jest is installed (either globally on your machine, or as a project dependency), you can run your tests by calling jest in your terminal. By default, the jest command will search your project for any files with the suffix .test.js, and run them.
Assuming that we have implemented our isEven() function correctly, we should see this output in our terminal when we run our test:

Let's introduce a bug into our code so we can see what a test FAIL looks like:
function isEven(num) {
  return num % 2 == 1; // the 0 has been changed to 1
}
If we rerun our test, we will see this output:
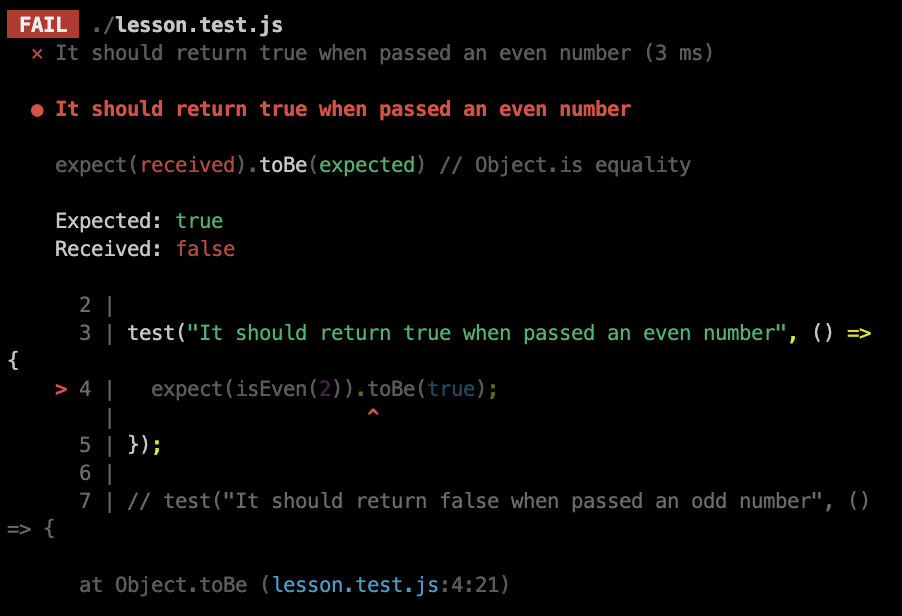
It might feel intimidating or discouraging to see a test fail. Let’s make an effort to set aside those feelings: a failed test doesn’t mean we failed as a developer, it means we succeeded in finding a bug! Now we have an opportunity to fix that bug before it impacts our users.
For now, we can focus on two important pieces of information in this FAIL message:
-
The test name:
It should return true when passed an even number- This is the first value we passed to our test() function.
- We used a descriptive name that helps us recognize what this test does.
- Using a unique and descriptive name becomes very important when you have dozens or hundreds of tests being run at the same time.
- You should think of test names like long variable names, they should be sufficiently descriptive that another developer seeing this test for the first time can understand what this test does without reading the code.
-
The
ExpectedvsReceivedvalues:- The
Expectedvalue is what we told Jest we think the code should return, e.g. what we passed to thetoBe()function - The
Actualvalue is what is actually returned by the code we passed to theexpect()function - In a failed test, these two values will be different. It is now your job as the developer to manually investigate your code to find out why they are different.
- The
What should we test?
When writing unit tests, we should think in terms of inputs and outputs.
A specific input is called a test case. Typically, a function will require more than one test case to give us confidence that it works as expected. A collection of tests that cover a variety of test cases is called a test suite. One of the more challenging aspects of writing tests is determining what test cases we should write tests for.
We can categorize different test cases into a variety of groups. Here are two of the most common:
-
Common Case:
- This means covering the usual expected inputs of your code.
- For example, when we tested
isEven(), we tried an even number and an odd number.
-
Edge Case:
- This means testing inputs at the edges of the allowed input ranges
- For example, let’s look at this division function:
// divides one number by another number
function divide(a, b) {
  return a / b;
}
A sneaky edge case exists for this function, which exists when b = 0. Since division by 0 has undefined behavior, we should also write a test that covers a set of inputs where b = 0.
3. Test-Driven Development
So far, we have written tests for functions that are already complete. But it is important to note that this is not necessary. We could write tests for a function before we implement the function, as long as we know what the expected behavior of that function should be.
Writing our tests before we write our code is called test-driven development, and this is a commonly used strategy in many areas of software development. Test-driven development is typically referred to by the acronym 'TDD' and has many benefits beyond producing a robust test suite. This methodology encourages engineers to be proactive with their design and think deeply about how they will solve problems before beginning to write code, as you cannot write proper tests without first understanding the axioms of the solution your project requires. TDD will also expose areas in projects that are difficult to test and will allow engineers to get ahead of difficult test scenarios before hand, this encourages engineers to write code that adheres more closely to best practices.
Let’s look at an example:
// write a function isPositive() that takes a single argument: a number

// The function should return true if the number is positive,
// and false if the number is negative
This function hasn’t been implemented yet, but we already know what the function should do.
Let’s consider our Common Cases:
- Since our function determines if a number is positive or negative, our common cases should include a positive number input and a negative number input
Let’s write a natural language assertion for each of these cases:
- When called with a positive number input, we expect the function to return true
- When called with a negative number input, we expect the function to return false
Now let’s convert those natural language assertions into Jest tests:
test("It should return true when passed a positive number", () => {
  expect(isPositive(3)).toBe(true);
});

test("It should return false when passed a negative number", () => {
  expect(isPositive(-3)).toBe(false);
});
Now let’s check if there are any edge cases:
- 0 is a valid input, but it is neither positive nor negative
- Since the behavior at 0 isn't obvious, this would be a good edge case
0 is a very common edge case when dealing with numerical and mathematical code. In this case, we should return false when isPositive() is called with the argument 0. 0 is not positive, and our isPositive() function doesn’t care if a number is negative, it only cares whether or not the value is positive. Since 0 is not positive, we should return false.
By writing our tests first, we are forced to consider these tricky edge cases before we begin implementing our code. This is a motivating reason to use Test-Driven Development. It forces us to consider what we want our code to do before we get invested in thinking about the details of HOW it does the work.
Let’s finish by writing our natural language assertion for our edge case:
- When called with a 0 input, we expect the function to return true
And now implement the Jest test:
test("It should return true when passed a 0 input", () => {
  expect(isPositive(0)).toBe(false);
});
Now we have a suite of 3 tests that we can run. As we proceed with writing our implementation of the isPositive() function, we can verify it as we go by running these tests. We know we are done writing the function once we can pass all of our test cases.
Regression Testing
We've already seen that testing helps us verify that our code works correctly right now, but what happens when another developer updates our code in the future?
One of the advantages of writing tests is preventing regression. Regression is the introduction of bugs into code that previously worked, and it is a common side effect of adding more features to a project.
If we write good tests, we can identify regression when it happens. For example, we can fork and clone an open-source repository onto our machine. We can then run any tests that are already in the project to confirm that it currently passes all the test cases. After we add our new feature to the project, we can re-run the test suite to confirm that all the tests still pass. This gives us more confidence that our new code has not broken any existing code.
Testing as a discipline
Testing is a broad and deep topic. Many engineers can make a career out of becoming experts in software testing. We have only scratched the surface of testing in this lesson, but the fundamental motivations for testing will not change as you learn more about testing in the future.
A walk through for JS unit tests using Jest as our test runner, assertion library & coverage reporter
Setting up for tests using Jest
- If you've not already, run
npm initto start a new package for your project - Install jest as a dev dependency
npm install jest --save-dev - Make a
/testfolder and make your first spec file egspec.js - Decide what you want to test! Let's make a function that adds two numbers together.
Making your code accessible to your test suite
Let's say you have a .js file with several functions inside it that you wish to test. The easiest way to make them accessible to other files is to export them.
function add(a, b){
    return a + b;
}

function multiply(a, b){
    return a * b;
}

module.exports = { add, multiply }
Note the use of destructuring above. What we have on the last line is the equivalent of putting:
module.exports = { add: add, multiply: multiply } \
- which is perfectly valid JavaScript, just a bit unnecessarily verbose!
Now we are exporting our functions, we can import them into our test file.
// in test file
const myFuncs = require('/path/to/my/functions/file')
Since we exported an object in this example, we can access those functions as properties of our object eg. myFuncs.add
Note that when testing client side code, if not using a module bundler such as webpack or [browserify](https://github.com/getfutureproof/fpguideswiki/wiki/Browserify), you will get a warning in the browser console that module is not defined. This isn't too big of a deal since you only need the exports during test, but to get rid of the console warning, you can wrap the export in a try/catch.
Writing your first test using Jest
Invoke jest's describe function which takes two arguments: a string & a function.
The first argument (the string) says what you're testing - this will be used in the output.
The second argument (the function) will say how we're going to test it. \
describe ('addThese', () => {} )Now let's fill out that function block (the bit in between the curly braces)
describe ('addThese', () => {
  // adding code here!
})
Now we have access to that function, we can make some assertions about it.
For each assertion, we will call on another jest function, test, which takes 2 arguments just as describe does - a string and a function.
describe('addThese', () => {
    expect(myFuncs.addThese).toBeDefined();
})
In the example above, toBeDefined is one of many 'matchers' offered by Jest. Other very common ones include toBe, toContain, toEqual, toBeTruthy and many more. You can negate most of these matchers by adding the .not method before them eg:
test('sentence', () => {
    let greeting = "Hello!"
    expect(greeting).not.toContain("goodbye")
})
Running your tests
The easiest way to run your tests is to write an npm script to do it for you! In your package.json file, add (or update) a "test" script to look something like this:
 "scripts": {
    "test": "jest --watch"
  },
Jest will automatically look for files with a .test.js extension and run as many as it finds.
The --watch flag is optional but recommended as it will keep the test runner up and re-run your tests when any changes are detected.
Another handy flag is --silent which will silence (not print out) and console log/warn/error calls you may be making in your app code. Whilst not essential, you may find the log output distracting during the test run.
Checking your test coverage
To get a check on what percentage of your code has test coverage, jest comes with a built in reporter:
-
Add a new npm script in your package.json:
"scripts": { "test": "jest --watch --silent", "coverage": "jest --coverage" }, - Now you can see your test coverage with
npm run coverage
Jest and node.js ESM vs cjs modules
Something you'll run into when writing unit tests with jest is that jest doesn't support ESM out of the box. ESM means ecma script modules, these are also referred to as ES6 modules. This module pattern is supported in newer versions of node but not out of the box in jest. Jest is built to deal with common javascript modules(cjs). If you want jest to support ESM, you'll have to configure your jest test project to utilize an interpreter with ESM enabled, typically this is babel.
Read up on the jest's teams current state of supporitng ESM modules here.
Read up more on ESM vs cjs modules as well as some other alternative modules paradigms here